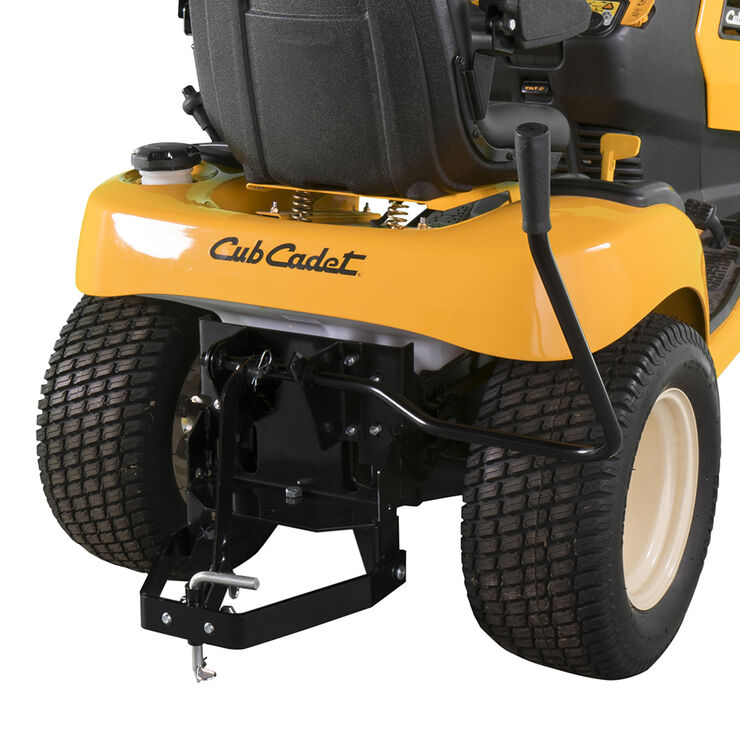
A well-adjusted sleeve hitch can make all the difference when it comes to achieving optimal performance from your garden tractor. Whether you’re preparing your soil for planting, leveling gravel, or managing other yard tasks, understanding how to properly adjust a sleeve hitch ensures your equipment works efficiently and effectively.
What is a Sleeve Hitch?
A sleeve hitch is a versatile attachment that allows you to connect various implements, such as plows, cultivators, and box scrapers, to your garden tractor. It provides a simple yet effective way to utilize your tractor for a range of gardening and landscaping tasks.
Tools You’ll Need
Before you start adjusting your sleeve hitch, gather the following tools:
- Adjustable wrench
- Socket set
- Measuring tape
- Lubricating oil (optional, for smooth operation)
- Owner’s manual for reference
Step-by-Step Guide to Adjusting a Sleeve Hitch

1. Inspect the Hitch Assembly
Before making adjustments, inspect the entire hitch assembly for signs of wear or damage. Look for loose bolts, rust, or misaligned parts. A well-maintained hitch will ensure smoother operation and longevity.
2. Set the Hitch Height
Adjusting the height is crucial to ensure your attachment makes proper contact with the ground. Follow these steps:
- Position the tractor on a level surface.
- Measure the height from the ground to the hitch point.
- Adjust the hitch up or down using the adjustment bolts until it aligns with the implement’s recommended height.
3. Adjust the Angle of the Implement
The angle of the attached implement affects its effectiveness in the soil. To achieve the correct angle:
- Loosen the adjustment nuts.
- Tilt the implement to the desired angle, ensuring it matches the intended use (e.g., slightly forward for plowing).
- Tighten the nuts securely to hold the angle in place.
4. Ensure Proper Alignment
Proper alignment prevents unnecessary strain on your tractor and attachment. Check that the hitch sits squarely in the mount and that the implement tracks straight when in use.
5. Test the Adjustment
Once you’ve made all the necessary adjustments, take the tractor for a test run in a small area. Observe how the implement engages with the ground and make further fine-tuning adjustments if needed.
Troubleshooting Common Issues
Even with careful adjustments, you may encounter a few common issues:
- Uneven Contact with Ground: Recheck hitch height and angle settings.
- Loose Attachments: Ensure all bolts and pins are tightened securely.
- Difficulty in Raising or Lowering: Lubricate moving parts and check for obstructions.
Personal Insight: Lessons Learned from Trial and Error
When I first got my garden tractor, I underestimated the importance of a well-adjusted sleeve hitch. I attached a cultivator and jumped right in, only to find it wasn’t digging evenly into the soil. After a few frustrating attempts, I realized a simple height and angle adjustment made all the difference. Taking the time to adjust it properly saved me hours of extra work and made my gardening projects much smoother.
Final Thoughts
Learning how to adjust a sleeve hitch for a garden tractor is an essential skill for any homeowner or gardening enthusiast. Proper adjustments ensure your attachments work efficiently, helping you achieve better results with less effort. By following these steps and conducting regular maintenance, you can extend the life of your equipment and improve your gardening or landscaping projects.


